Grab My Blinkie

I design for...


About Me

- Alika
- I am Angela aka Alika. PSPing for 8 years, have been making kits for a lil over a year. I have two children. 1 daughter who is 3 and 1 son who is 20 months. You may use my scrap kits in your tutorials or challenges but please link them back to me. Thanks! I would love to see your creations with my kits please email them to alikasscraps@hotmail.com and I will add them to my blog!
Tuesday, October 20, 2009
 Thanks Tutorial
Here is my very first Tutorial for you all. Thanks for looking!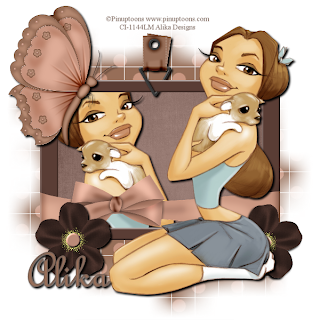
Supplies:
PSP
My FTU kit called "Thanks" here
WSL Mask 84 Here
Tube of choice
I am using the wonderful artwork of Pinuptoons, you must have a license in order to use this artwork, to purchase a license please go to CILM

Supplies:
PSP
My FTU kit called "Thanks" here
WSL Mask 84 Here
Tube of choice
I am using the wonderful artwork of Pinuptoons, you must have a license in order to use this artwork, to purchase a license please go to CILM
New image 600 x 600
Copy and paste frame03 as new layer
Resize 50 percent
Select with magic wand inside frame, holding shift button make sure to click all three parts of the inside frame
Let go of shift
Copy and paste as new layer Paper15
Selections-Invert
Edit-Clear (make sure you are on the paper layer)
Open up WSL Mask84
Minimize it
Copy and Paste as new layer paper16
Layers, new mask layer, from image, select wsl mask84, make sure invert is unchecked, click ok
Merge group and move down to bottom layer
Select inside of frame again, all three holding shift
Selections modify, expand by 4
Copy and paste tube as new layer, place where you want it
Selections invert
Edit, clear
Selections, select none
Effects, 3d effects, drop shadow, 3,3, 100, 5 black
Copy and paste your tube again, place where you like, drop shadow the one as above
Copy and paste hanger02 as new layer
Image, resize by 50 percent twice
Drop shadow same, 3, 3, 100, 5, black
Move to top of frame as mine
Use eraser tool to erase part of hanger to make it look like it is holding the frame (see mine for reference)
Copy and paste butterfly01 as new image
Image resize by 50 percent
Arrange at top left of frame
Same drop shadow
Copy and paste flower01 as new layer
Resize by 50 percent, twice
Same drop shadow
Move to bottom left of frame
Duplicate
Image mirror
Move that layer under tube layer
Add any more elements that you like with drop shadows
Add copyrights
Merge visible
Add name I used font: French Script MT size 72 stroke 2
Colors- Fill: #976e58 Stroke color: #7a6459
Same drop shadow
File save as a png file.
Thanks!
Subscribe to:
Post Comments (Atom)
Stay Away
My Hideouts :O


0 comments:
Post a Comment