Grab My Blinkie

I design for...


About Me

- Alika
- I am Angela aka Alika. PSPing for 8 years, have been making kits for a lil over a year. I have two children. 1 daughter who is 3 and 1 son who is 20 months. You may use my scrap kits in your tutorials or challenges but please link them back to me. Thanks! I would love to see your creations with my kits please email them to alikasscraps@hotmail.com and I will add them to my blog!
Wednesday, September 28, 2011
 PTU Tag Showoff - Hatin Bitches

Saturday, September 24, 2011
New FTU Halloween Tag

Friday, September 23, 2011
New Tube for Sale!
It is time to reveal my secret! Yay I dont know how much longer I could have kept it in! I am pleased to say that PSP Asylum has given me a chance to feature my new tube(s);) in their store to test out the waters and if you all like this tube of mine and think its totally rocking and smexy! I will continue to do more for yall :D ok ok and now, here she is revealed in 13 interchangeable layers so let your creativity flyyyyyyyyyyyyyyyyyyy! http://pspasylum.com/index.php?main_page=product_info&cPath=18&products_id=616

Sunday, September 18, 2011
PTU Sexy Goth Tag Showoff

Saturday, September 17, 2011
FTU Tag Showoff!


Wicked Intentionz - PTU Tag

Tuesday, September 13, 2011
Everyday Moments Mini Tut FTU!

Made this siggy for another showdown over at Siggy Showdown come join us HERE
What you need:
Beautiful art of Pinuptoons which you can purchase HERE you must have a license and purchase their art in order to use them in any images/creations!
Scrapkit: Saving This Moment by Jaelop Designs, leave some luv! Its a freebie! Grab it HERE
Mask: I am not sure where the mask I used came from it has no copyright layer or no naming convention I am sorry :( Any mask will do! If you know where this mask came from please email me so I can give full credit to the creator! Thanks (its a oldie I had lol)
Mask: I am not sure where the mask I used came from it has no copyright layer or no naming convention I am sorry :( Any mask will do! If you know where this mask came from please email me so I can give full credit to the creator! Thanks (its a oldie I had lol)
Font: Miss Lee Gatees
Naughty Halloween Mini Tut FTU!

I made this tag for a showdown in Siggy Showdown totally rocking forum come join us HERE
What you need:
PSP dont cha know it smexy biatches! hehehe
This fabulous FTU tube by Ismael Rac, you still need a license to use his art so if you dont have one yet make sure to get one from customer service! You can grab up this Freebie tube HERE
Scrapkit: My new FTU Halloween kit which you can grab HERE
Font: Tolkien
Sunday, September 11, 2011
Spookylicious Cluster Frame FTU

Friday, September 9, 2011
Starific Art PTU Tutorial
FAIR WARNING - This tutorial was written to give some humour, fun and awesomeness to the tutorial world. I am being a lil off the wall and hyper with this so IF you are offended easily, I probably would skip this tut O.O

This tutorial is for those that have a working knowledge of Paint Shop Pro.
What you need:
The beautiful artwork of Pinuptoons is what I am using in this tag, you must have a license in order to purchase and use this image you may grab it and some more of their other images HERE
This beautiful and versitile scrapkit by Mystical Illusionz Scraps called Anonyamous, It is a PTU kit and you can get it here
Effects: Drop Shadow
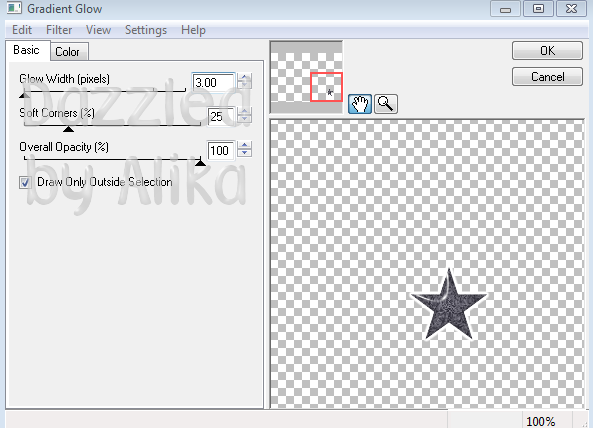
Filters: Eye Candy 4000 - Gradient Glow
Font: Pot Roaster (What a odd yet funny name!)
Dont forget the Mojo Fairy! And when your done, turn her over to me...or else!!!!!!
Ok, now that we have that normal, repetitive shiznet done we can start! Yesssssssssss, excited? I am! So you better get excited to or I’ll have to come spank ya for being naughty!
Open up New Canvas 600x600...bet ya already new that smexy biatch didnt ya?!?!
Copy and paste ele46, resize by 75% Woot looking good already :D (I love this frame!)
Use magic wand for selection tool, click in both of the frames, selections mody expand by 3. STOP I didnt say 4...nooooooo not 2...3...THREE whats distracting ya this time?!?! OOO icecream huh...good idea, brb in 10!
.....
...
..
.
YUM that was tasty! How about you? :P Lets continue now shall we before you get distracted again!
Paste pp4 as new layer, resize by 75%, invert, edit, clear and drag down below frame layer
Paste ele52 as new layer and place down at bottom of two frames, drag layer below the frame and paper layer.
Paste ele50 and repeat like above (resize to 65% though), make sure ele50 is above the green splatter too.
Merge the two layers, duplicate and go to image, flip. How awesome is that! Like totally Im telling ya this is gonna be another one of your new rocking awesome tags that you can say I learned how to do it from Alika, Tutorial Extraordinaire!
Paste your tube, place how you wish on the tag, duplicate and change layer properties to soft light. Dont get all crazy here either and start duplicating and adding more properties and effects and filters and ending up with one Alien looking tube! Ok, Step awayyyyyyyyyyyyy from the PSP before you do it..I know your tempted but....dont...Alien tubes are NOT fucking smexy!
Add whichever elements to the tag that you like. This kit has a lot of different kinds so play it up a bit OR follow me if you wish with the ones I used and placements.
Go ahead and add your copyright now. Make sure you have the right artists too, dont want to have to go back and redo all over again now do we!
For the font I am using Pot Roaster (awesome name!) size 72, with colors #4871ff and #86c820. Apply a gradient glow with the settings below: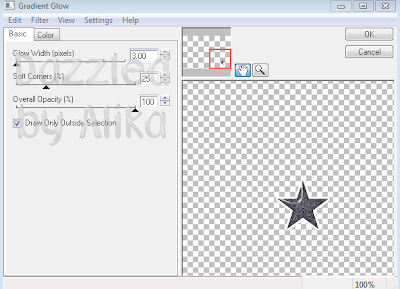
Now go back through each layer, add the following dropshadow settings to everything because that’s what makes a fucking awesome tag ya know! Wooohoo:

Save that biatch (without the name) as a .png and a .psd incase of any changes and so you can slap all your new totally awesome friends names on it! That’s it for now meh sexy biatches have a wonderful day and don’t get into to much trouble! Me…………well, Im off to be naughty buwhahahahha!

Save that biatch (without the name) as a .png and a .psd incase of any changes and so you can slap all your new totally awesome friends names on it! That’s it for now meh sexy biatches have a wonderful day and don’t get into to much trouble! Me…………well, Im off to be naughty buwhahahahha!
Tuesday, September 6, 2011
Hollywood FTU Mini tut!

Sorry meh sexy biatches I wont be tuting up this glamorous Hollywood tag, but I will post links to the materials that I used so you can try to make one rocking tag like this! Oh and best of all...its FTU! yessssss those are the best right?!?!??!
Tube: Awesome Artwork by Zebrush you can purchase HERE do NOT use any of the artists images without purchasing it with proper license.
Scrapkit: FTU kit by Kristi called Uptown Girl which you can grab HERE
Mask: This blinds mask by Monti which you can grab HERE
Font: Times New Roman and Freestyle
Plugins: Filters Unlimited-Paper textures-Papyrus
DSB Flux-Bright Noise
Eye Candy 4000- Glass and Gradient Glow
Xero- Fritillary
Monday, September 5, 2011
Sexy Badass Tutorial! PTU
FAIR WARNING - This tutorial was written to give some humour, fun and awesomeness to the tutorial world. I am being a lil off the wall and hyper with this so IF you are offended easily, I probably would skip this tut O.O


What you need:
Paint Shop Pro - duh :P
Caffeine...I prefer coke oh and some chocolate infact just gimmie all of your coke and chocolate and no one will get hurt alright sexy ho! woot ok ok lets get for real......I know right......oo dont forget mojo dust!
Paint Shop Pro - duh :P
Caffeine...I prefer coke oh and some chocolate infact just gimmie all of your coke and chocolate and no one will get hurt alright sexy ho! woot ok ok lets get for real......I know right......oo dont forget mojo dust!
Tube by Elias Chatzoudis now, I am using the smexy fucking tube that is da shiznet BUT you cant have this tube...only awesome taggers can have this tube..jk hehehe however, this tube is NOT for sale It is a Siggy Showdown forum exclusive which is a totally rocking forum so to earn this tube and be apart of this forum visit us HERE or you can use another one of Elias's tubes which you must purchase a license for HERE
This totally naughty scrapkit by Wicked Princess Scraps called Death Becomes Her which you can purchase HERE It is a collab for the T.A.G organization which is a very awesome program going on to help people in need read more about it HERE
Weescotslass Creations Mask #84 you can get HERE
Plugins: Xero-Fritilliary, DSB Flux- Bright Noise, Eye Candy 4000 Glass and Gradient Glow
Font: Times New Roman and FB Lipgloss
Last but surely not least your mojo fairy....dont have one you say? Easy fix! Just go steal someone elses like I do and hold it hostage, maybe give it a lil rum before you return it to their owners. Hey they dont call me Mojo Fairy Thief for nothing!
Got everything meh sexy biatches? Good lets get started!
Open up PSP (duh! I know just bare with me here), new canvas 600x600
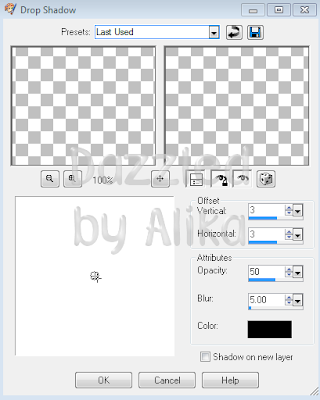
Copy and Paste circle frame, resize it by 80% twice. Add following dropshadow settings:

Use freehand laso tool to go around the frame i just go like in the middle of the frame as shown below:


Grab paper PP2 copy and paste as a new layer, image resize that sucker by 75%, selections, invert, edit, clear omg here we go again with the redundant shit huh?!?!
Drag that layer underneath the frame layer, looks totally rocking huh? Yeah thats right even YOU can make rocking tags that arent even finished yet but they just oozeout awesomeness!
Drag that layer underneath the frame layer, looks totally rocking huh? Yeah thats right even YOU can make rocking tags that arent even finished yet but they just oozeout awesomeness!
Grab you tube of choice, im using a closeup of the tube for this one, copy and paste it and position it as you wish in the frame.
Duplicate that sexy mug and drag the original layer underneath the frame becase im about to show you the most awesome thing you will ever learn!!!
Duplicate that sexy mug and drag the original layer underneath the frame becase im about to show you the most awesome thing you will ever learn!!!
Ok ok dont get to excited yet, its simple, but way cool if you wanna do this shit like me ;)
Wait ok hold on, IF you want a drop shadow, go ahead and apply the settings before on the original copy of the tube (the one under the frame biatch!)
Now pay CLOSE attention.........yo sexy ho I said pay CLOSE attention quit looking at that sexy shirtless guy running down the road.....
Now pay CLOSE attention.........yo sexy ho I said pay CLOSE attention quit looking at that sexy shirtless guy running down the road.....
We good now?!?! GREAT lets continue
Take your rectangle selection tool from the left tool bar make sure the COPY of the tube layer is selected this is the layer above the frame. Yes above, not below above
that smexy guy isnt going to be running back the other way anytime soon.
Draw a rectangle with the tool from the bottom of the tube to a bit above the frames bottom of the tube. Confused yet? Figured ok, do it like this!

Now edit clear OMG theres shit hanging out the bottom of the frame!!! right? ok well we are going to do the same thing but this time on the original layer and make sure
you do not go OVER the frame you wanna keep you selection tool below and in the middle of the frame.
you do not go OVER the frame you wanna keep you selection tool below and in the middle of the frame.
Ok thats it my biatches! we are so done! No? It looks to plain? Really? ok ok yeah it does lets continue shall we.
I wanna go ahead and add my mask so open up your mask, minimize it, open up PP10 in kit, copy and paste as new layer, resize it by 75%
Go to layers, new mask layer, from image and choose your mask image from the drop down menu, source luminance checked and make sure invert mask data is unchecked. Yes unchecked..stop...why did ya check it fool? Go ahead, click it again to uncheck it now we are back on track click ok. pretty huh?
Right click on the mask group layer choose merge group, and then drag it all the way to the bottom layer you want it behind the tube frame and paper!
Lets snaz it up a bit to make it totally awesome and add a filter, lets do xero fritillary with the below settings:

Ok I dont want to bore you with so many filters this time so we are just going to continue on.
Add whichever elements you like to the tag or you can follow mine
Ill tell ya which ones I used so you can be awesome like me remember!
Bad Girl Paddle
Bad Teddy
Bomb
Boot
Bottle
Brassknuckles
Cane
Choker
Cuffs2
Lips 2
Loopywire
Plasticstar
Thornyheart
Whip1
Bad Teddy
Bomb
Boot
Bottle
Brassknuckles
Cane
Choker
Cuffs2
Lips 2
Loopywire
Plasticstar
Thornyheart
Whip1
Woot now we are done! Go ahead and crop around your image if you like make sure not to crop to close to the mask layer! No need to resize this tag today so go ahead and plop that copyright on there so you dont get into trouble. I use black, times new roman and use a gradient glow setting. You can use any color you want just make sure the copyright is readable!
Now save as a .png without the white layer if you have it and as a .psd incase you need to make changes.
For the name I am using colors #962264 and #514565 as a gradient with the repeat set as 10.
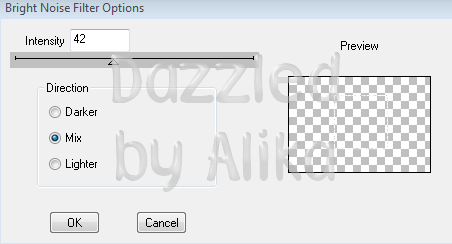
Font is sized 72 and FB Lipgloss. Apply the following DSB Flux Bright Noise settings:
Then apply the following glass settings:

Then the following gradient settings:

Add a drop shadow and post that biatch everywhere you can to show how you can make a awesome totally bitching tag like this!
Thats it for today and I hope you enjoyed this bitching tut and it made your day brighter! And remember if you like my tuts leave me a comment or a shout in my chat box and Ill continue to make these fucking awesome tuts for you!
Sunday, September 4, 2011
So Fresh So Clean Tutorial FTU
FAIR WARNING - This tutorial was written to give some humour, fun and awesomeness to the tutorial world. I am being a lil off the wall and hyper with this so IF you are offended easily, I probably would skip this tut O.O

What you need:
Tube by Keith Garvey get it HERE. You must have a license in order to use his images!
Scrapkit by Scrapofangel its a freebie called Delirious Bath Time get it HERE
Template 416 by Missy Minx get it HERE
Plugins: Xero Fritillary, DSB Flux Bright Noise, Eye Candy 4000 Glass and Gradient Glow, Eye Candy 5 Nature Icesicles
Font: Disney Comic, Times New Roman and Virgil GS
Step 1. I'm not gonna write this tut for you because you can't do dis shit like I can.
Template 416 by Missy Minx get it HERE
Plugins: Xero Fritillary, DSB Flux Bright Noise, Eye Candy 4000 Glass and Gradient Glow, Eye Candy 5 Nature Icesicles
Font: Disney Comic, Times New Roman and Virgil GS
Step 1. I'm not gonna write this tut for you because you can't do dis shit like I can.
.....
...
Cricket..Cricket..
Ok im just kidding haha but, I had to do it ;) And if you cant do rocking tags like me well, this tutorial will get ya there!
Ok open up Template 416 by Missy
Delete copyright layer, copy and paste your tube right smack in the middle resize it by 80% to fit and then click on the eye in layers to hide that layer for now.
Click on frame back layer, go to your kit copy paper 12, go back to template selections, select all, float, defloat paste that fucker right on there. Resize paper by 25%, selections invert, edit and clear. then select none. hide the frame back layer by clicking on the eye making it red, no dont punch it, left click it.
Click on the frame layer, whoa wait did you just really lick that screen? I know it looks all sexified now and what not but, just dont...go...there....! Now, go to effects, plugins, dsb flux and bright noise using the following settings. Then go to effects, 3d effects and drop shadow with the following settings. Come on stop complaning hos we are just getting started!
Next choose your circle center layer, and do the fucking redundent select all, float, defloat blahh blah blah. copy and paste paper 5 as new layer, resize by 15%, selections invert and edit clear select none. click the circle center layer's eye so it disappears. Then add the same drop shadow settings as before.

Next choose your circle center layer, and do the fucking redundent select all, float, defloat blahh blah blah. copy and paste paper 5 as new layer, resize by 15%, selections invert and edit clear select none. click the circle center layer's eye so it disappears. Then add the same drop shadow settings as before.
Click on the dotted rectangle selection tool over on the left toolbar, use the down arrow and choose magic wand, click on circle left layer and then on the actual circle and now pay close attention so you dont get this wrong its easy but, we will see. click over on the circle right layer and then left click on the right circle. Both should have marching ants around them now right? No? well, fuck I cant explain it any better than that. Go do that blah blah bull of select all, float, defloat.
Choose paper 14 from scrap kit, paste as a new layer and resize 25%, move the new raster layer up above the circle left layer. Selections, invert, edit clear omg doesnt that annoy the hell out of you or is it just me? well anyways lets continue on. Hide your circle left and right layers by clicking on the eye and making them have red X over it from now on ill just say hide layer because thats the "technical" term right?!?!
Oh yeah make sure you choose select none too ok. On your new paper raster layer we just made go to effects, plugins, xero, fritillary and use the below settings.
(5,29,93,197)

Now dont click off the layer, omg hello I said DONT click off the layer, ok we back on track? AWESOME I want you to be able to rock this tag like I did ;). ok ok NOW go to effects, texture effects, blinds and use the below settings:

Dude that looks AWESOME now doesnt it? better! ;) ok hold on my biatches while I go get me some more coke woot. Maybe with a shot of rum in it too! O.O
Ok now we going to put papers on the rest of the template pretty fast because honestly im quite tired of having to put papers on this template arent you? So I want you to do the redudant select all, float, defloat, paste, resize, invert and clear without me telling you to right? I know you can do it cuz youz my sexy ho!
Rounded edge pink layer I used paper 7 resized it to 25% and made sure i hid the original layer in template.
Rounded edge black layer I used paper 16 and did it all over again! Fuck I forgot to add drop shadows ok ok on the last two layers we just did, go back and add those sexylicious drop shadows!
Ok we back on track again? great, apparently I must have a simple mind I forget things easily, yes this is actually true LMAO
Square 2 layer i used paper 8 resized 15% used cross road looking move tool to get it how i liked and used the sexylicious drop shadows again. See i didnt forget this time!
I used the same paper and stuff for square 1, creative aint i? ;)
Copy paste paper 15 at 15% on the square 3 layer. dun forget dropshadows! You gotta make this tag POP ya know! ok by now I have way to many layers in my lil box over there on the right so what i do is anyone thats been HIDDEN right click on them and DELETE. Be careful or ill have to spank ya if you delete a paper, unhidden layer!
Look I forgot something AGAIN geez wtf are you going to do with me huh? Remember to be able to make rocking tags like me, you have to make mistakes cuz I sure as hell aint prefect! Click on the two white circle back layers and drop shadow those biatches.
Ok if you deleted your tube that was hidden like I accidently did, readd it and resize it to 80%
Choose a 1 colors off your tube (i used her clothes) using the color dropper tool in the left toolbar, double click on the color. on the two thin rectangles and the two stars select all, float, defloat, NEW RASTER LAYER, use the flood fill bucket tool over on left toolbar and fill your new layer with the color do this for all 4 layers and HIDE the original layers.
Choose a 1 colors off your tube (i used her clothes) using the color dropper tool in the left toolbar, double click on the color. on the two thin rectangles and the two stars select all, float, defloat, NEW RASTER LAYER, use the flood fill bucket tool over on left toolbar and fill your new layer with the color do this for all 4 layers and HIDE the original layers.
Ok on the two thin rectangles we just changed colors to I want you to go to plugins, eye candy 5 nature Icesicles and use the factory settings default just like it is but click on basic and change the max length to 43.69 see below. Do this for both thin rectangles! 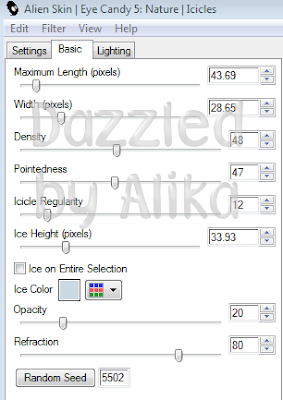
On the two star layers use the plugins, dsb flux birght noise with settings below. Then Eyecandy glass with the below settings:
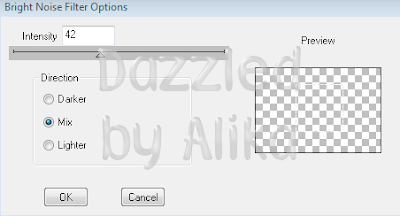

On the two star layers use the plugins, dsb flux birght noise with settings below. Then Eyecandy glass with the below settings:


Then eyecandy gradient glow with the below settings

Now drop shadow them crazies!
Have we used enough filters/plugins yet my sexylicious biatches? I think so!
ok I need you to go to Image, canvas size and choose 800x800 yes I know HUGE right! no worries we just need room to add elements and text! We will crop and resize at the end as needed. You need a big space if you wanna be a rocking sexylicious tagger!
ok I need you to go to Image, canvas size and choose 800x800 yes I know HUGE right! no worries we just need room to add elements and text! We will crop and resize at the end as needed. You need a big space if you wanna be a rocking sexylicious tagger!
Ok i like to start my elements by adding glitter or some sort of splash type element behind all the template and stuff so im using freebie (6) and pasting it in various places behind all the layers. Make sure to dropshadow!
Unhide your tube layer and make the bottom of it lay directly in line with the bottom rectangle line. Drop shadow it! hehe im a drop shadow whore and soon you will be too!
Copy and paste freebie (18) and place it at the bottom of your tube, kinda like its in the middle of the water. sexy mmmmmmmmm and wet woot ;)
Take a couple of the flower elements from the kit resize them by 10% and place them somewhere you like on the template. You can follow me like I did by placed them above and below the two circles. To get a element to show behind a layer just drag the element layer down until its below the layer you want! How much do you love me now? Alot I hope ;)
Copy and paste element freebie (21) the bath tub and put it over the splashing water at bottmo of the tube but where you can still see some splashing water and drop shadow again. Ok time for our wording!
Use font disney comic size 24 colors #484e7e and #85838e with the gradient settings for the background as below.


Ok remember all that rocking stuff we did to the stars? Use those glass settings, gradient glow settings and drop shadow settings all over again for the text and use the mover tool to place it above the icicles on the thin rectangles.
Go ahead and use the crop tool to crop around the tag so its smaller and not so much space now I recommend saving this in your photos as a .psd (incase u need to make changes) and a .png (so its transparent in the back) because now that you've done this awesome sexy rocking tutorial with this amazing result all your friends will want one! So be prepared to start a always list too ;)
Image, resize and resize it to 600 at the width the height will auto populate and resize all layers.
Go ahead and add your copyright text im using black, times new roman and size 8 for it. Dont want to forget to add this so I usually add it before I do any name adding! I also usually use gradient glow for this ;)
Go ahead and add your copyright text im using black, times new roman and size 8 for it. Dont want to forget to add this so I usually add it before I do any name adding! I also usually use gradient glow for this ;)
Oh yeah make sure ya use a snazzy looking made by slogan, make it as naughty as you want because naughtier is better right!?!?!?!
Ok now for the name woot we are ALMOST done, glad huh? Me to! beliiiiiieve me! lol. I used #063e45 for the font color and Virgil GS for the font, size 72. Used the same xero fritillary settings as before, glass, gradient glow and drop shadow. Move that sucker somewhere that you think looks good i did mine near the bottom, left. Save as a .png and spread the love around!
Thanks so much if you actually read all the way through here! This tut was written to be informative YET funny so I hope you enjoyed it and if you did and would love to see more tuts like this instead of the normal copy/paste this copy/paste that and your done tutorial then please leave a comment below or in my chat box! If alot of ppl like it then I will continue to make tuts like this that are funny and slightly off the wall. LOL
Rockstar tut!
Afternoon everyone! I made this tag using this great collab with Freya and me for T.A.G you can read more about T.A.G HERE. Its a wonderful thing and you can get this rocking collab where 100% of proceeds goes towards the cause HERE
Font used: Jacquard
Effects: Drop Shadow
Plugins: Eye Candy - Glass and Gradient Glow (settings below under the tag)

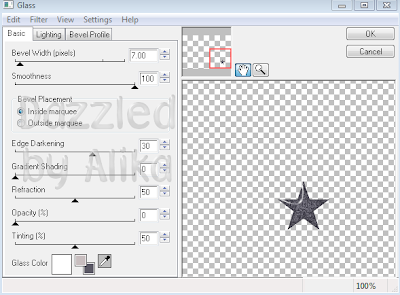
ok I thought yall would like to see what the settings are that I used on effects and plugins so I am going to start posting screenshots for everyone! Totally awesome right?!?! Ok so here are the ones I used for this tag.
Eyecandy Glass:

EyeCandy Gradient Glow:

Effects-Ed Effects: Drop Shadow

I hope this makes it more informative and easier for everyone!
Subscribe to:
Posts (Atom)
Stay Away
My Hideouts :O