Grab My Blinkie

I design for...


About Me

- Alika
- I am Angela aka Alika. PSPing for 8 years, have been making kits for a lil over a year. I have two children. 1 daughter who is 3 and 1 son who is 20 months. You may use my scrap kits in your tutorials or challenges but please link them back to me. Thanks! I would love to see your creations with my kits please email them to alikasscraps@hotmail.com and I will add them to my blog!
Tuesday, October 25, 2011
 Tag Showoff - PTU

Good evening smexies! I made another tag and wanting to show it off!
Artwork used: Zebrush you may purchase this art along with others HERE you may only use the art if you have purchased and obtained a legal license!
Scrapkit: PTU Asian Tea House by Gemini Creationz click HERE for her blog to see where to purchase this kit!

Monday, October 24, 2011
Tag Show off

Here is a tag I just made. I joined a brand new but totally awesome forum called Taggers Against Drama! Lookem up they rock!
I used the awesome art of Elias Chatzoudis you may purchase his work HERE You may not use his art without properly purchasing and securing a license!
Sunday, October 23, 2011
Autumn Tease - PTU Tutorial

Hello smexies I got a new tut for yall! This tutorial is written for those who have good knowledge of PSP and any resemblance to any other tutorial is purely coincidental!!
Artwork by Eugene Rzhevskii this is an exclusive tube but you may purchase his others HERE
Scrapkit: Autumn Calling PTU by Chi Chi Designz find how out to purchase on her blog HERE
Font: TypoUpright BT
Mask: By Jus Graphix Grab it HERE its the first one
Lets get started:
new canvas 600x600
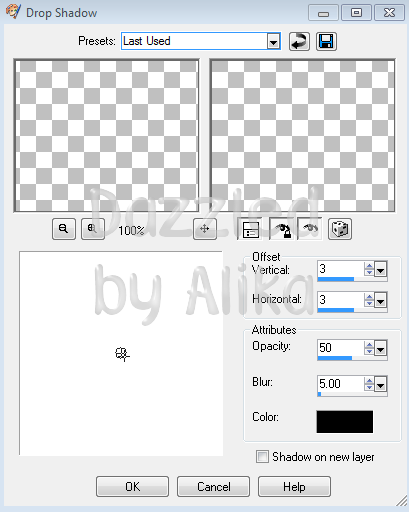
c/p frame 2 - resize 50% - add dropshadow - move over to the bottom right some
c/p frame 1 - resize 65% - add dropshadow - move to upper left corner of frame 2
use selection tool, rectangle, to outline around the middle of the frame 2
c/p paper 11 - resize 50% - selections - invert - edit - clear - drag paper layer underneath frame layer
use slection tool, freehand, to outline around the middle of frame 1
c/p paper 1 - resize 50% - selections - invert - eidt - clear - drag paper layer underneath frame layer
c/p ladder element - resize 80% - move inbetween frames - drag layer underneath your circle frame and paper layers - add dropshadow
c/p mushrooms element - resize 50% - move over to lower right corner of frame 2 - add dropshadow
c/p ribbon element - resize 50% - image - mirror - drag element to right/inside of frame 2 - add dropshadow - drag layer underneath frame layer but above paper layer
use eraser tool - erase any of the ribbon element showing outside the frame
c/p parchment element - resize 50% - move to middle of tag - add dropshadow - drag layer underneath mushroom element layer
open up your mask - resize 80% - minimize - c/p paper 2 - resize 75% - layers - new mask layer - from image - choose mask image from dropdown - uncheck invert mask data
merge group - drag layer to very bottom of layers - resize layer 90%
c/p bird element - resize 50% - move down to bottom left of tag
c/p flower trail 1 element - add dropshadow - duplicate - image - mirror - merge down - drag layer right above mask layer
c/p mouse element - reize 50% - add dropshadow - move to bottom right of tag
c/p tube of choice - move underneath circle frame layer - position face in frame
use selection tool - freehand selection to go around middle of frame -selections - invert - edit - clear - change properties to lumianane legacy - opacity 50
c/p tube of choice - resize as desired - I did 50% - add drapshadow - move right underneath frame layer - duplicate - move copy right above frame layer
use eraser tool to erase parts overlaping the frame and elements - leave top part of tube there
select original tube underneath frame - use eraser tool carefully to erase parts overlapping frame and elements
add copyright - I used times new roman size 8 - I use a slight gradient glow on all my copyrights from eyecandy 4000 you dont have to
add name - I used #cad747 and #dc0c00 - TypoUpright BT - size 48 - slight gradient glow with the color black - dropshadow
Thats it smexies!
Sunday, October 16, 2011
Smexified Tut- PTU

I am using the smexy artwork of Verymany! You can purchase their art HERE
Scrapkit is a PTU kit called A Bit Emo by Schnegge's Scraps thanks so much hun I love this kit!
Font: Care Bear Love
Plugins: Eyecandy 4000 - Glass, Gradient Glow
Alright smexy biatches lets start, by opening up a new image 600x600
C&P Frame03, resize 80% add a dropshadow to it.
C&P Frame01, make sure it is placed underneath Frame03
Use freehand selection tool to outline middle of Frame03
C&P Paper01, resize 50%, Selections, invert, edit, clear. Move paper layer underneath Frame01
G&P Glitter heart element put at bottom left of frame, add drop shadow
C&P tube of choice, add a drop shadow, duplicate. Drag original below frames layers and above paper layer.
Select copy of tube, use eraser tool to erase extra over the frames and the heart element.
C&P Glittersplat01, resize 50% and place in upper left of frames, dropshadow, duplicate, image flip, image mirror, merge down and drag layer to bottom of layers so its behind frames tube and paper.
Add all the elements you want, be creative, go crazy! Remember lots of elements and placing stuff over tubes makes it hard for pirates to steal!
Add your copyrights, I use timesnewroman size 8 and I put a gradient glow and drop shadow on it then image, rotate, free rotate to the right and moved it over.
Now its time for the name! This is where im hoping to teach ya something new thats not in my other tuts yet!
I used font: Care Bear Family and used the color picker to choose a purple and dark blue from the tag. I hid my foreground and choose my background as a gradient: foreground/background angle 134 with 4 repeats.
Add your text, Convert to raster layer, duplicate!
Highlight the original text go to effects, texture effects and Mosaic Glass, use these settings:

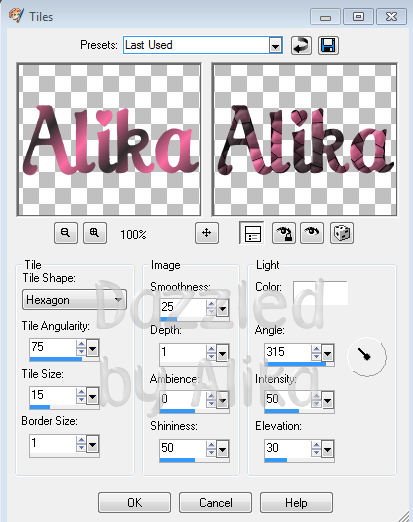
Highlight the duplicated text, go to effects, texture effects and tiles, use these settings:
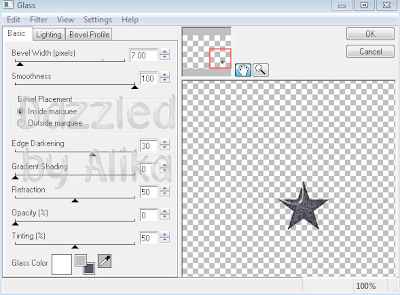
Add the following glass, gradient glow and then drop shadow settings:


Merge down the two text layers together, use mover tool to place at bottom of frames and save that smexy looking tag!
Friday, October 14, 2011
Siggy Showdown Blog Train Snags
Siggy Showdown is having a blog train with their members woot! Here are some snags I made for the blog train. You can get to the blog HERE. Not everyone has their items up yet but they will so so check back often!
I made these with the awesome artwork of Keith Garvey. This one is a exclusive for Siggy Showdown but you may purchase his other work at PTE
I used a FTU scrapkit from Addictive Pleasures called Punkky you can get it HERE
Font: CoventryGarden
Plugins: Eyecandy 4000 Glass and Gradient Glow, DSB Flux - Bright Noise
Please click on each snag to get the full size thanks!


Tuesday, October 11, 2011
Verymany Addiction!!!!! - PTU Tutorial
This tutorial is written for those with a basic knowledge of PSP. This tutorial is also written to be funny yet informative!

I am using the smexy artwork of Verymany. You can not use this artwork without first purchasing it to do so, you can do that HERE
I am using the amazing PTU kit by Amy Marie called Emolution Addiction. You can visit her blog HERE to see where you can purchase this rocking kit!
Template: 417 by Minxy get it HERE
Font: Giddyup Std
Plugins: Eyecandy 4000 Glass, Gradient Glow
Plugins: Eyecandy 4000 Glass, Gradient Glow
Ok smexy biatches and ho's lets start!
Open the template! :O
Canvas size, 800x800 in middle. Crop to your liking. Image, resize pixels 600x600
Select all, float, defloat circle, paste as new layer paper 22, image resize 80%. Selections invert, edit and clear
Select all, float, defloat circle, paste as new layer paper 22, image resize 80%. Selections invert, edit and clear
Adjust, hue saturation, colorize on cricle back settings: hue 0 saturation 0
Adjust, color balance, manual color correction: source #808080 and target #9d7cd1
Star 1 and 2 apply hue saturation settings again and manual color correction settings again.
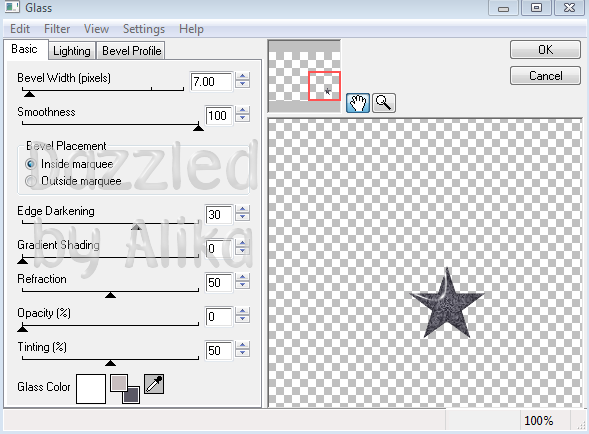
On both stars apply following eyecandy 4000 settings for glass and gradient glow:
On both stars apply following eyecandy 4000 settings for glass and gradient glow:

Add following drop shadow settings for both stars:

Select all, float, defloat on rectangle layer, paste paper 6 as new layer, resize 80%. Selections invert, edit and clear. Make sure you close off the original rectangle layer or else it will look crappy showing a bit of the orginal on the sides of the paper.
Select all, float, defloat on center rectangle layer, paste paper 23 as new layer, resize 80%, Selections invert, edit and clear and close off original layer.
OOOoooo lookie there, we forgot to add drop shadow to the rectangle layer we just did...again....I always do this shiznit! So, go back and add the dropshadow settings from before to the layer.
Apply hue and saturation settings as before on the thin rectangle layer. Apply color balance, manual color correction settings as before on same layer except change target to: #fb4472
Drop shadow that biatch! Because this iz wat we do ;)
Drop shadow that biatch! Because this iz wat we do ;)
Select all, float, defloat blah blah bs on the larger middle rectangle, paste as new layer paper 4, image resize 80%, selections invert then edit, clear. Close out original layer.
On below layer, rectangle background, adjust color balance, manual color correction change the source to #ffffff and target to: #411d6e
Add the infamous drop shadow settings.
On the other rectangle back layer, repeat manual color correction setps above just change target to: #ff6791 and drop shadow that smexy thing!
On small rectangle layer, select all, float, defloat, paste paper 19 as new layer, resize 80%, selections invert, edit clear and add that drop shadow.
WAIT.........you forgot something didnt you? I was testing you to see if you remembered.....hmmmmmm dont know what it was? Close out the original layer ;) Dont forget next time now!
On the frame layer, adjust, color balalnce, manual color correction change target to #808080.
Select all, float, defloat, make a new raster layer with the properties of overlay from the drop down. Set your foreground color to: #ff6791 and your background color to: #b596e6. Click up on the foreground color block, change it to gradient with settings: Foreground-background Angle: 134, Repeats 4 and make sure style is the first block with the link going across.
Flood fill your new raster over the frame with the gradient. Select none.
STOP dooooooont you dare close out the original layer this time we need it to keep the bevel in the template ;)
On frame back layer, select all, float, defloat omg this gets repeatitive again hah! Paste paper 1 as new layer, resize 80%, selections, invert and edit clear. Close off the original layer.
Repeat above on layer raster 18.
Go back and add a drop shadow to the original frame layer.
Alright looking smexy so far already! Now that all our papers are on there time to add elements and tubes woot woot
Slap that sexy ass tube that your using on there, where ever you wish. I placed mine right at the bottom of the black rectangle. Add a drop shadow :D
Now you can use more than 1 tube from the same artist if you purchased them from the same licenses company, but if you dont, dont worry and just use the same tube over on the frames. I am going to be using different Verymany tubes because I have sooo many! (yes I am a huge verymany addict! hehehe
Paste tube 1 as new layer, resize as needed, select all, float defloat on the frame background layer. Move tube how you want in the top frame. selections, invert, edit clear. My tube was big enough to cover all three frames so ima just leave it as that for this time because it looks good.
Do the same for the bottom frame with a diff tube or same one. Make sure you smexy biatches drag those tube layers down below the frame layer and above the frame background layer.
Merge those two tube layers my merging down. Change property settings to Opacity: 70
Select all, float defloat on the small stars layer, new raster layer flood fill with the gradient as before. Close off original. Add eyecandy glass, gradient glow and drop shadow settings as before.
Now here comes the fun part and PSP is all about creativity right? I dont want to "restrict" anyones creativity so from here on out, add whichever elements YOU smexy ho's want! Have fun with it, go all out or keep it simple! Its your creation right?!?! So, get to it just make sure you add dropshadows to all the elements since your wanting to learn how to make freaking awesome tags like me ;)
Ok all done?? Awesome, now add your credits anywhere on the tag. Make sure the credit is VISABLE! I use times new roman, size 8 in the gradient colors from before, and apply the eyecandy glass, gradient and drop shadow settings.
Make sure you save this freakin smexy tag as a .png or .psd file so you can add all your fans and friends or even foes if you have any!!! names on it :D yes I said it, give your foes tags, even if they dont want them, KILL them with kindess! ;)
Now we are going to add our text! I used font size 72 and font GiddyupStd. I changed the foreground color to #434343 and left the background as the purple one, with the same gradient settings.
Apply the same eyecandy 4000 glass, gradient glow and drop shadow settings!
VIOLA! We are done! Isnt that one awesome smexy tag you got now?!?! Now go show it off and let them know you made it after this tutorial and send em to my blog I can use some more smexy biatches and hos!

Saturday, October 8, 2011
Thanksgiving Tag Showoff - PTU

Autumn Romance Tag Showoff - PTU

Tuesday, October 4, 2011
Sinful Delight Forum Set Show Off - No Scraps
Here is a smexy Halloween forum set I made for a challenge over at the Siggy Showdown Forum.
I am using the awesome art of Aivelin which you can purchase for use HERE
and the font Waking the Witch.
This forum set was made completely old skool with no scraps and using filters in psp.


Saturday, October 1, 2011
PTU Tag Showoff - Boo

Subscribe to:
Comments (Atom)
Stay Away
My Hideouts :O