Contact Me
About Me

- Alika
- I am Angela aka Alika. PSPing for 8 years, have been making kits for a lil over a year. I have two children. 1 daughter who is 3 and 1 son who is 20 months. You may use my scrap kits in your tutorials or challenges but please link them back to me. Thanks! I would love to see your creations with my kits please email them to alikasscraps@hotmail.com and I will add them to my blog!
My TOU
Meh Stalkers
Sunday, October 23, 2011
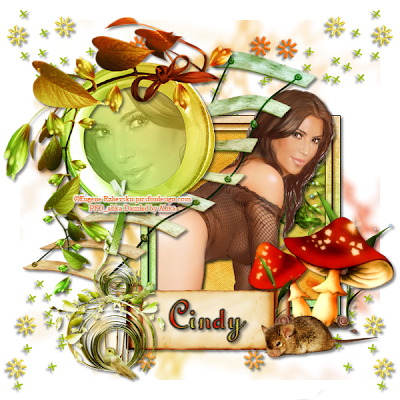
 Autumn Tease - PTU Tutorial

Hello smexies I got a new tut for yall! This tutorial is written for those who have good knowledge of PSP and any resemblance to any other tutorial is purely coincidental!!
Artwork by Eugene Rzhevskii this is an exclusive tube but you may purchase his others HERE
Scrapkit: Autumn Calling PTU by Chi Chi Designz find how out to purchase on her blog HERE
Font: TypoUpright BT
Mask: By Jus Graphix Grab it HERE its the first one
Lets get started:
new canvas 600x600
c/p frame 2 - resize 50% - add dropshadow - move over to the bottom right some
c/p frame 1 - resize 65% - add dropshadow - move to upper left corner of frame 2
use selection tool, rectangle, to outline around the middle of the frame 2
c/p paper 11 - resize 50% - selections - invert - edit - clear - drag paper layer underneath frame layer
use slection tool, freehand, to outline around the middle of frame 1
c/p paper 1 - resize 50% - selections - invert - eidt - clear - drag paper layer underneath frame layer
c/p ladder element - resize 80% - move inbetween frames - drag layer underneath your circle frame and paper layers - add dropshadow
c/p mushrooms element - resize 50% - move over to lower right corner of frame 2 - add dropshadow
c/p ribbon element - resize 50% - image - mirror - drag element to right/inside of frame 2 - add dropshadow - drag layer underneath frame layer but above paper layer
use eraser tool - erase any of the ribbon element showing outside the frame
c/p parchment element - resize 50% - move to middle of tag - add dropshadow - drag layer underneath mushroom element layer
open up your mask - resize 80% - minimize - c/p paper 2 - resize 75% - layers - new mask layer - from image - choose mask image from dropdown - uncheck invert mask data
merge group - drag layer to very bottom of layers - resize layer 90%
c/p bird element - resize 50% - move down to bottom left of tag
c/p flower trail 1 element - add dropshadow - duplicate - image - mirror - merge down - drag layer right above mask layer
c/p mouse element - reize 50% - add dropshadow - move to bottom right of tag
c/p tube of choice - move underneath circle frame layer - position face in frame
use selection tool - freehand selection to go around middle of frame -selections - invert - edit - clear - change properties to lumianane legacy - opacity 50
c/p tube of choice - resize as desired - I did 50% - add drapshadow - move right underneath frame layer - duplicate - move copy right above frame layer
use eraser tool to erase parts overlaping the frame and elements - leave top part of tube there
select original tube underneath frame - use eraser tool carefully to erase parts overlapping frame and elements
add copyright - I used times new roman size 8 - I use a slight gradient glow on all my copyrights from eyecandy 4000 you dont have to
add name - I used #cad747 and #dc0c00 - TypoUpright BT - size 48 - slight gradient glow with the color black - dropshadow
Thats it smexies!
Subscribe to:
Post Comments (Atom)
Talk to me!
Smexy Quick Links
- Addictive Pleasures (1)
- Aivelin (1)
- Alehandra (1)
- Alikas Pinups (3)
- Alikas Scraps (12)
- Amy Marie Kits (1)
- Angels Designz (6)
- Animated (1)
- Autumn (1)
- Barbara Jensen (5)
- Blog Layout (1)
- Broken Dreamz Scrapz (1)
- Chi Chi Designz (3)
- Christmas (1)
- Cluster Frame (4)
- CT Team member (1)
- Dark (2)
- Ditzy Dezigns (1)
- Elias Chatzoudis (7)
- Ellie_Milk (2)
- Emo (3)
- Enys Guerrero (1)
- Eugene Rzhevskii (3)
- Exclusive (1)
- Forum Set (2)
- FourXsDesigns (1)
- Freebie (2)
- Freya Langford-Sidebottom (1)
- FTU Tag (15)
- FTU Tutorial (8)
- Gary Rudisill (1)
- Gemini Creationz (1)
- Gothic Inspirations (1)
- Halloween (3)
- Heza Scraps (3)
- Ismael Rac (3)
- Jaelop Designs (1)
- Jose Cano (3)
- Karrot (1)
- Keith Garvey (4)
- Kristi W. Designs (1)
- Mini Tut (10)
- Misticheskaya (1)
- Moshilove (1)
- Mystical Illusionz Scraps (9)
- Need new blinkie (1)
- New Years (1)
- No Scraps (2)
- Non-Animated (2)
- Pinuptoons (6)
- PolkaDot Scraps (1)
- PTU Tag (39)
- PTU Tutorial (13)
- Redfill (1)
- Schnegge Scraps (3)
- Scotts Sketches (2)
- Scrapoangel (1)
- Siggy Showdown (1)
- Snags (1)
- Thanksgiving (1)
- Tony T (1)
- Toxic Desires (3)
- Tubes (1)
- Tutorial (6)
- Valentines (2)
- Verymany (5)
- Wicked Princess Scraps (6)
- Zebrush (2)
- Zlata_M (2)


0 comments:
Post a Comment